TRS-Xenix v01.03.05 Exploration: Difference between revisions
No edit summary |
No edit summary |
||
| Line 1: | Line 1: | ||
= Obtaining Install Media = | |||
A really nice collection of TRS-80 stuff is available [https://github.com/pski/model2archive/ here]. There's a fair bit of both non-Xenix and Xenix stuff, but for now we only need the Xenix stuff. What we need are all the IMDs (except XNX135FM.IMD) from [https://github.com/pski/model2archive/tree/master/Software/Xenix/700-2052%20-%20TRS-XENIX%20Multi-User%20Operating%20System/01.03.05/ here]. | |||
= Setting up our VM = | = Setting up our VM = | ||
| Line 6: | Line 9: | ||
Now, open up the command prompt as in order to run TRS-Xenix 1.x you need a special command line argument which you can't configure in the GUI. | Now, open up the command prompt as in order to run TRS-Xenix 1.x you need a special command line argument which you can't configure in the GUI. | ||
I use this command to run trs80gp provided the DREM config file autogenerated with the DREM disk image is stored as "xenix.cfg" and the Xenix install disk is | I use this command to run trs80gp provided the DREM config file autogenerated with the DREM disk image is stored as "xenix.cfg" and the Xenix install disk is XNX135D1.IMD: | ||
<code>trs80gp.exe -m16 -d0 | <code>trs80gp.exe -m16 -d0 XNX135D1.IMD -h xenix.cfg -x1hack</code> | ||
= Setting up Xenix = | = Setting up Xenix = | ||
Revision as of 19:05, 1 April 2023
Obtaining Install Media
A really nice collection of TRS-80 stuff is available here. There's a fair bit of both non-Xenix and Xenix stuff, but for now we only need the Xenix stuff. What we need are all the IMDs (except XNX135FM.IMD) from here.
Setting up our VM
This version of Xenix is for TRS-80 model 16 computers only, thankfully I know an emulator that can run this. Let's set it up by downloading trs80gp.
At first, let's create a hard disk image by simply opening up trs80gp, going to the "Hard Drive" menu and clicking the "unformatted DREM" option in the 4: submenu.
Now, open up the command prompt as in order to run TRS-Xenix 1.x you need a special command line argument which you can't configure in the GUI. I use this command to run trs80gp provided the DREM config file autogenerated with the DREM disk image is stored as "xenix.cfg" and the Xenix install disk is XNX135D1.IMD:
trs80gp.exe -m16 -d0 XNX135D1.IMD -h xenix.cfg -x1hack
Setting up Xenix
WIP: this stuff is just copied from tox's ibm xenix 1.00 page as a placeholder
If you want to download this version, please check it out on WinWorld.
Now, back on topic. We'll install Xenix now.
First, insert the BOOT diskette. Then, type 'fd /etc/badtrack'. Once that is done, boot the Xenix kernel by entering 'fd /xenix.fd' (not /xenix, /xenix.fd)
Now, let's set up the hard disk. Simply type hdinit, and follow along. If it asks you how Xenix should be set up on the hard drive, just say that Xenix should take up all the space on the hard disk. It will erase the hard drive and copy some basic utilities onto there. Then, remove the floppy and boot into the hard disk once it has been finished.
Now, type 'xinstall base'. Insert the base floppies. This will install the base system. The script doesn't really check the product type, so you can use the same command but different floppies -- like you can use 'xinstall base' but insert the bundled SDK floppies to install the bundled SDK.
That's really about it when installing Xenix. Once the installation is done, you can remove the floppies and boot into the hard drive. However, the only available user is root. You can add one later, however.
Adding a user is simple. Once in the root account, just type 'mkuser' to create a user. Once you've logged into the user, you will get a welcome mail message. To read it, simply type 'mail'. To quit it, IIRC, you can type 'q'. Home directories are in the /usr folder. If you created a user by the name 'test', then it would be at /usr/test.
More information may be in the manuals, which are available at Bitsavers.
Developing software
For Xenix
WIP: this stuff is just copied from tox's ibm xenix 1.00 page as a placeholder

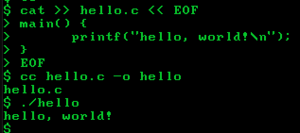
I created a file named 'hello.c' using the following command:
cat >> hello.c << EOF
This will output the contents of stdin into hello.c until you give it the literal string EOF.
And so, here is the source code of hello.c:
main() {
    printf("hello, world!\n");
}
Now, we compile it using
cc hello.c -o hello
And then, we simply run it! It gives out the message like we would've expected.
There is also like you might've expected, a linker, by the name of ld -- and a lot of other things, too. There is yacc and lex included, and adb. Although, yacc might not be included in the included SDK. You might have to use the specific SDS, which can be found on WinWorld.
Makefile
Interestingly, there is a make implementation in the SDK. For the "hello, world!" application under Xenix, you can write this extremely simple Makefile:
hello: hello.c
    cc hello.c -o hello
and save it as simply 'Makefile'. Oh yeah, by the way, make sure those 4 spaces in front of 'cc hello.c' is actually a tab when you enter it in.
And, for compiling the simple DOS "hello, world!":
all: doshello.exe copy

doshello.exe: doshello.c
    cc doshello.c -dos -o doshello.exe

copy: doshello.c
    doscp doshello.exe /dev/fd0:/doshello.exe
Interesting extra software
WIP